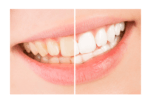
Whiten Your Teeth Instantly with Photoshop: A StepbyStep Guide
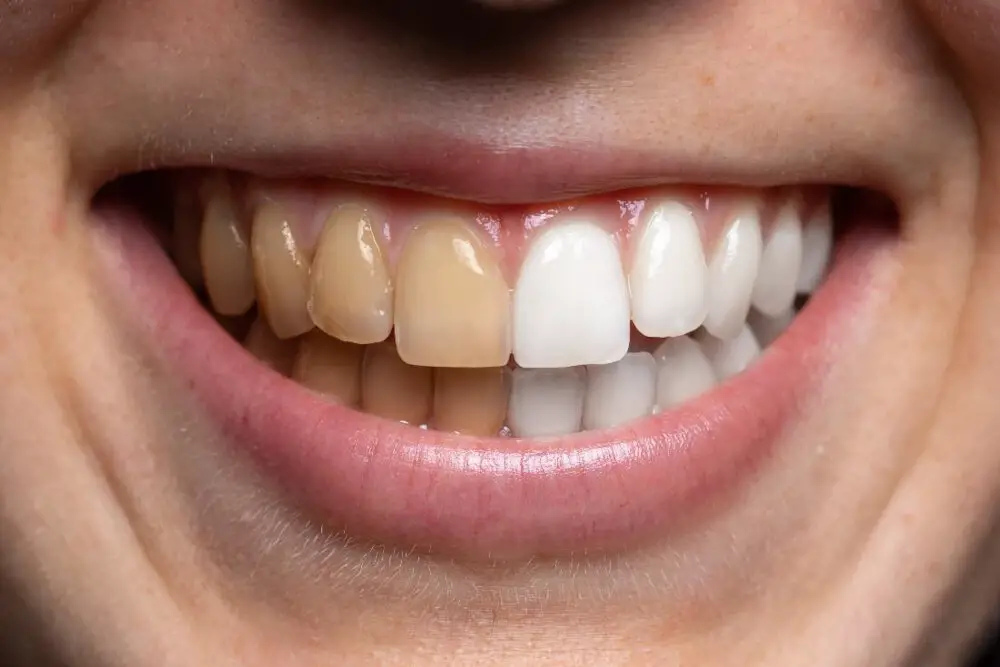
A dazzling smile can be an instant confidence booster, but not everyone is blessed with naturally white teeth. But don’t worry, Photoshop is here to save the day! With just a few clicks, you can whiten your teeth and transform your smile to look like a Hollywood star. In this step-by-step guide, we will show you how to whiten your teeth instantly with Photoshop, so you can get that perfect smile without spending a fortune on expensive treatments. Whether you have a photo shoot or a special event coming up or just want to improve your social media photos, this tutorial is for you. With a basic understanding of Photoshop tools and techniques, you can achieve a natural-looking tooth whitening effect that will leave you amazed. So, grab your computer and let’s get started on transforming your smile from dull to dazzling in just a few clicks.
The idea of spending time and money on expensive teeth whitening treatments might not be everyone’s cup of tea, especially when there’s a cheaper and more efficient way to achieve the same results. This step-by-step guide offers a simplistic approach to teeth whitening by using Photoshop, a powerful photo editing software. Imagine the convenience of being able to whiten your teeth in a matter of minutes without having to leave the comfort of your home or spending hundreds of dollars on professional treatments. With this guide, you’ll learn how to use Photoshop to whiten your teeth instantly, giving you the confidence to smile bright in your photos.
Step 1: Select the Teeth
The first step in whitening your teeth using Photoshop is to select the teeth. This may sound like a simple task, but it is crucial to get it right in order to achieve the desired result. To select the teeth, you will need to use the Lasso tool, which is located in the toolbar on the left-hand side of the screen. Once you have selected the Lasso tool, you can begin to trace around the teeth, making sure to include all of the visible teeth. It may take a few attempts to get the selection just right, but it is important to be patient and take your time. Once you have selected the teeth, you will need to refine the selection to ensure that only the teeth are affected by the whitening process. To do this, you can use the Select and Mask option, which is located under the Select menu at the top of the screen. This will open up a new window where you can adjust the selection to make sure that it is as accurate as possible. Once you are happy with the selection, you can move on to the next stage of the process, which is to apply the whitening effect. Overall, selecting the teeth is a crucial part of the process, and it is important to take your time and be as precise as possible to achieve the best possible result.
In order to achieve a brighter smile in your photos, the first step is to carefully select the teeth using either the Lasso tool or the Quick Selection tool in Photoshop. It is important to zoom in on the photo to ensure precise selection, as even the slightest mistake can affect the final result. By taking the time to select the teeth accurately, you can create a natural-looking effect that will enhance the overall appearance of your photo. So, get ready to dazzle with a radiant smile by following this simple step-by-step guide.
Step 2: Adjust the Levels

Adjusting the levels is a crucial step in whitening teeth using Photoshop. This step helps to adjust the brightness, contrast, and tonal range of the image, which is essential in achieving a natural-looking result. You can access the levels adjustment tool by going to Image > Adjustments > Levels or by using the keyboard shortcut Ctrl + L (Command + L on a Mac). The levels adjustment tool will open up a histogram, which is a graph that displays the tonal range of the image. The histogram is divided into three sections: shadows, midtones, and highlights. To whiten teeth, you need to adjust the midtones and highlights. To do this, move the sliders underneath the histogram to the left until you achieve the desired level of brightness. Be careful not to overdo it, as this can result in an unrealistic effect. You can also adjust the output levels by moving the black and white sliders to the left and right, respectively. This helps to increase the contrast and make the teeth appear whiter. Once you are happy with the adjustments, click OK to apply them to the image. In conclusion, adjusting the levels is a simple but essential step in whitening teeth using Photoshop. It helps to enhance the brightness and contrast of the image, resulting in a natural-looking effect. By following the steps outlined above, you can achieve a brighter, whiter smile in just a few minutes.
In the article titled \Whiten Your Teeth Instantly with Photoshop A Step-by-Step Guide,\ the author explains how to make teeth appear whiter in photos using Photoshop. One of the steps the author suggests is adjusting the levels of the photo to make the teeth appear brighter. To do this, the reader is instructed to go to Image > Adjustments > Levels and move the white slider to the left until the teeth appear brighter. By following this step, the reader can achieve a brighter and more radiant smile in their photos, with the help of just a few clicks in Photoshop.
Step 3: Whiten the Teeth

Step 3: Whiten the Teeth is a crucial step in achieving a stunning smile in your photos. Teeth discoloration is a common issue that many people encounter, but with Photoshop’s help, it can be easily fixed. To begin, select the \Lasso\ tool and carefully trace around the teeth you want to whiten. Once you have made the selection, click on \Adjustments\ and choose \Hue/Saturation.\ Adjust the saturation slider to desaturate the color of the teeth, which will make them appear whiter. You can also adjust the lightness slider to make the teeth brighter, but be careful not to overdo it, as it can make the teeth look unnatural. Furthermore, if you want to make the teeth look even brighter, you can use the \Dodge\ tool. Select the \Dodge\ tool and set the brush size to a small size. Then, carefully brush over the teeth, being careful not to go over the edges. This will brighten up the teeth and make them appear whiter. However, be careful not to overdo it, as it can make the teeth look too bright and unnatural. With these simple steps, you can easily whiten your teeth in your photos and achieve a beautiful, natural-looking smile.
In the article titled \Whiten Your Teeth Instantly with Photoshop A Step-by-Step Guide,\ the author guides the reader on how to whiten their teeth using the Brush tool in Photoshop. The instructions are clear and concise, as the reader is advised to select white as the color and carefully paint over the teeth until they reach the desired level of whiteness. However, the reader is also cautioned not to paint over the gums or other parts of the mouth. By following these steps, anyone can easily and quickly brighten their teeth in Photoshop and enhance their smile in photographs.
Step 4: Add Realism
Step 4: Add Realism is the key to making your teeth whitening look as natural as possible. Once you’ve lightened the teeth, it’s important to make sure that they still look like real teeth and not artificially brightened blocks. One way to do this is by adjusting the saturation and brightness of the rest of the image to match the newly whitened teeth. You can also use the burn tool to add some subtle shadows around the teeth, making them look more three-dimensional and less flat. The key is to make sure that the teeth still look like they belong in the mouth and are not just floating in the image. Another important aspect of adding realism is to ensure that the teeth match the overall color balance of the image. If the image is warmer, for example, you may need to adjust the teeth slightly to match that warmth. This can be done by using the Color Balance adjustment layer or by adjusting the temperature and tint of the image. By taking the time to add these subtle touches, you can make sure that your teeth whitening looks as natural as possible and blends seamlessly into the rest of the image.
If you’re looking to enhance your smile in a photo, adding a subtle yellow tint to your teeth can make all the difference. The key is to keep it natural-looking, which can be achieved by creating a new layer and filling it with a light yellow color. By setting the blending mode to Soft Light and adjusting the opacity, you can achieve a realistic-looking effect that won’t appear too harsh or artificial. This handy tip is just one of the many ways you can use Photoshop to perfect your selfies and create the perfect smile. With a little practice and experimentation, you’ll be amazed at how easy it is to make your teeth look whiter and brighter in just a few simple steps.
If you’re unhappy with the color of your teeth in photos, you don’t have to break the bank to achieve a brighter smile. With just a few simple steps in Photoshop, you can whiten your teeth instantly and improve your confidence in your online presence. This option is especially great for those who want to avoid the cost and hassle of professional teeth whitening treatments. By following the step-by-step guide, you’ll be able to transform your photos and showcase your best smile. So why not give it a try and see the difference it can make in your photos?
Conclusion
In conclusion, while using Photoshop to whiten your teeth instantly might seem like a quick and easy solution, it’s important to remember that it’s not a substitute for good oral hygiene and regular visits to the dentist. Overuse of Photoshop to enhance one’s appearance can also contribute to unrealistic beauty standards and a negative impact on self-esteem. However, if used in moderation and with awareness, Photoshop can be a fun and useful tool for enhancing your photos and boosting your confidence. Remember to always be true to yourself and embrace your natural beauty.
Related posts:
 Snow Teeth Whitening: A StepbyStep Guide on How to Achieve a Brighter Smile
 Master the Art of Drawing Teeth: StepbyStep Guide for Beginners
 Are Teeth Whitening Strips Safe? Everything You Need to Know for a Bright Smile
 Teeth Whitening: How Often Should You Do It for a Brighter Smile?
 Cosmetic Dental Procedures – Veneers and Home Teeth Whitening
 Say Goodbye to Stains: Easy Ways to Remove Teeth Stains at Home
 Natural Teeth Whitening Tips & Tricks To Get Rid of Yellow Teeth
 Your Guide to Dental Implant Surgery